Vue.js
Learn how to use Feedbackflow’ React Native SDK to integrate your surveys into React Native applications.
Prerequisites
Before getting started, make sure you have:- A running web application with user authentication in your chosen framework.
- A Feedbackflow account with your environment ID and API host, available in the Setup Checklist under Settings.
HTML
All you need to do is copy a<script> tag to your HTML head:
Required Customizations
Now, visit the Validate Your Setup section to verify your setup!
React.js
Install the Feedbackflow SDK using one of the following package managers:npm, pnpm, or yarn.
Note that zod is required as a peer dependency and must also be installed in your project.
npm
pnpm
yarn
App.js/ts file to initialize Feedbackflow.
src/App.js
Required Customizations
Now, visit the Validate Your Setup section to verify your setup!
Next.js
Next.js projects use either the App Directory or the Pages Directory. Since the Feedbackflow SDK runs on the client side, follow these steps based on your setup:-
App Directory: Create a new component in
app/feedbackflow.tsxand call it inapp/layout.tsx. -
Pages Directory: Initialize Feedbackflow directly in
_app.tsx.
npm
pnpm
yarn
App directory
app/feedbackflow.tsx
app/layout.tsx
Pages directory
src/pages/_app.tsx
Required Customizations
First, initialize the Feedbackflow SDK to run only on the client side. To track page changes, register the route change event with the Next.js router.
Next, go to the Validate Your Setup section to verify your setup!
Vue.js
Integrating the Feedbackflow SDK with Vue.js is easy. We’ll ensure the SDK is only loaded and used on the client side, as it’s not meant for server-side use.npm
pnpm
yarn
src/feedbackflow.js
src/main.js
Required Customizations
Now, visit the Validate Your Setup section to verify your setup!
React Native
Install the Feedbackflow React Native SDK using one of the package managers, i.e., npm, pnpm, or yarn.npm
pnpm
yarn
App.js/App.tsx file to initialize Feedbackflow:
src/App.js
Required Customizations
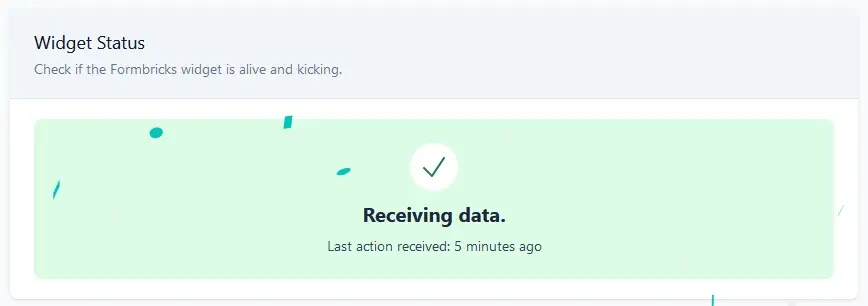
Validate your setup
Once you’ve completed the steps above, validate your setup by checking the Setup Checklist in the Settings. The widget status indicator should change from this: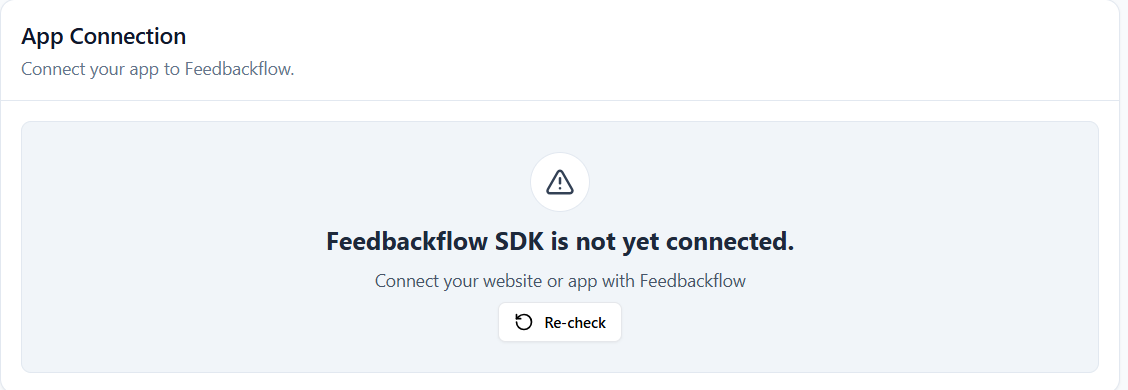
Debugging Feedbackflow Integration
Enabling debug mode in your browser can help troubleshoot issues with Feedbackflow. Here’s how to activate it and what to look for in the logs.Activate Debug Mode
To enable debug mode, add?feedbackflowDebug=true to your app’s URL (e.g., https://example.com?feedbackflowDebug=true).
View Debug Logs
- Open your browser’s developer tools:
-
Google Chrome/Edge: Press
F12or right-click and select “Inspect” > “Console”. -
Firefox: Press
F12or right-click and select “Inspect Element” > “Console”. -
Safari: Press
Option + Command + Cto open developer tools and go to the “Console” tab.
Common Use Cases
Debug mode is helpful for:- Verifying Feedbackflow initialization.
- Identifying issues with survey triggers.
- Troubleshooting unexpected behavior.
Debug Log Messages
Logs provide insights into:- API calls and responses.
- Survey triggers and form interactions.
- Initialization errors.