> ## Documentation Index
> Fetch the complete documentation index at: https://docs.feedbackflowhq.com/llms.txt
> Use this file to discover all available pages before exploring further.
# Framework Guides
> Easily add the Feedbackflow App Survey SDK to your app with guides for different frameworks.
Integrate the **Feedbackflow App Survey SDK** into your app using multiple options. Explore the available choices below.
[All you need to do is add three lines of code to your HTML script, and that's it!](https://feedbackflowhq.com/docs/app-surveys/framework-guides#html)
[Load our JavaScript library with your environment ID, and you're ready to
go!](https://feedbackflowhq.com/docs/app-surveys/framework-guides#react-js)
[Natively add us to your Next.js project, with support for both App and Pages project
structure.](https://feedbackflowhq.com/docs/app-surveys/framework-guides#next-js)
Learn how to use Feedbackflow' React Native SDK to integrate your surveys into React Native applications.
[Easily integrate our SDK with your React Native app for seamless survey support.](https://feedbackflowhq.com/docs/app-surveys/framework-guides#react-native)
## Prerequisites
Before getting started, make sure you have:
* A running web application with user authentication in your chosen framework.
* A Feedbackflow account with your **environment ID** and **API host**, available in the **Setup Checklist** under **Settings**.
## HTML
All you need to do is copy a `
```
### Required Customizations
| Name | Type | Description |
| -------------- | ------ | ---------------------------------------- |
| environment-id | string | Feedbackflow Environment ID. |
| app-url | string | URL of the hosted Feedbackflow instance. |
Now, visit the [Validate Your Setup](#validate-your-setup) section to verify your setup!
## React.js
Install the Feedbackflow SDK using one of the following package managers: `npm`, `pnpm`, or `yarn`.
Note that **`zod`** is required as a peer dependency and must also be installed in your project.
```javascript npm theme={null}
npm install @feedbackflow/js zod
```
```bash pnpm theme={null}
pnpm add @feedbackflow/js zod
```
```bash yarn theme={null}
yarn add @feedbackflow/js zod
```
Update your `App.js/ts` file to initialize Feedbackflow.
```javascript src/App.js theme={null}
// other imports
import feedbackflow from "@formbricks/js";
if (typeof window !== "undefined") {
feedbackflow.setup({
environmentId: "",
appUrl: "",
});
}
function App() {
// your own app
}
export default App;
```
## Required Customizations
| Name | Type | Description |
| -------------- | ------ | ---------------------------------------- |
| environment-id | string | Feedbackflow Environment ID. |
| app-url | string | URL of the hosted Feedbackflow instance. |
Now, visit the [Validate Your Setup](#validate-your-setup) section to verify your setup!
## Next.js
Next.js projects use either the **App Directory** or the **Pages Directory**. Since the Feedbackflow SDK runs on the client side, follow these steps based on your setup:
* **App Directory**: Create a new component in `app/feedbackflow.tsx` and call it in `app/layout.tsx`.
* **Pages Directory**: Initialize Feedbackflow directly in `_app.tsx`.
Code snippets for the integration for both conventions are provided to further assist you.
```bash npm theme={null}
npm install @feedbackflow/js zod
```
```bash pnpm theme={null}
pnpm add @feedbackflow/js zod
```
```bash yarn theme={null}
yarn add @feedbackflow/js zod
```
### App directory
```typescript app/feedbackflow.tsx theme={null}
"use client";
import { usePathname, useSearchParams } from "next/navigation";
import { useEffect } from "react";
import feedbackflow from "@formbricks/js";
export default function FeedbackflowProvider() {
const pathname = usePathname();
const searchParams = useSearchParams();
useEffect(() => {
feedbackflow.setup({
environmentId: "",
appUrl: "",
});
}, []);
useEffect(() => {
feedbackflow?.registerRouteChange();
}, [pathname, searchParams]);
return null;
}
```
```typescript app/layout.tsx theme={null}
// other imports
import FeedbackflowProvider from "./feedbackflow";
import { Suspense } from "react";
export default function RootLayout({
children,
}: {
children: React.ReactNode;
}) {
return (
{children}
);
}
```
### Pages directory
```javascript src/pages/_app.tsx theme={null}
// other import
import { useRouter } from "next/router";
import { useEffect } from "react";
import feedbackflow from "@formbricks/js";
if (typeof window !== "undefined") {
feedbackflow.setup({
environmentId: "",
appUrl: "",
});
}
export default function App({ Component, pageProps }: AppProps) {
const router = useRouter();
useEffect(() => {
// Connect next.js router to Feedbackflow
const handleRouteChange = feedbackflow?.registerRouteChange;
router.events.on("routeChangeComplete", handleRouteChange);
return () => {
router.events.off("routeChangeComplete", handleRouteChange);
};
}, []);
return ;
}
```
### Required Customizations
| Name | Type | Description |
| -------------- | ------ | ---------------------------------------- |
| environment-id | string | Feedbackflow Environment ID. |
| app-url | string | URL of the hosted Feedbackflow instance. |
First, initialize the Feedbackflow SDK to run only on the client side. To track page changes, register the route change event with the Next.js router.
Next, go to the [**Validate Your Setup**](#validate-your-setup) section to verify your setup!
## Vue.js
Integrating the Feedbackflow SDK with Vue.js is easy. We’ll ensure the SDK is only loaded and used on the client side, as it’s not meant for server-side use.
```bash npm theme={null}
npm install @feedbackflow/js
```
```bash pnpm theme={null}
pnpm add @feedbackflow/js
```
```bash yarn theme={null}
yarn add @feedbackflow/js
```
```javascript src/feedbackflow.js theme={null}
import feedbackflow from "@formbricks/js";
if (typeof window !== "undefined") {
feedbackflow.setup({
environmentId: "",
appUrl: "",
});
}
export default feedbackflow;
```
```javascript src/main.js theme={null}
// other imports
import feedbackflow from "@/feedbackflow";
const app = createApp(App);
app.use(router);
app.mount("#app");
router.afterEach((to, from) => {
if (typeof feedbackflow !== "undefined") {
feedbackflow.registerRouteChange();
}
});
```
### Required Customizations
| Name | Type | Description |
| -------------- | ------ | ---------------------------------------- |
| environment-id | string | Feedbackflow Environment ID. |
| app-url | string | URL of the hosted Feedbackflow instance. |
Now, visit the [Validate Your Setup](#validate-your-setup) section to verify your setup!
## React Native
Install the Feedbackflow React Native SDK using one of the package managers, i.e., npm, pnpm, or yarn.
```bash npm theme={null}
npm install @feedbackflow/react-native
```
```bash pnpm theme={null}
pnpm add @feedbackflow/react-native
```
```bash yarn theme={null}
yarn add @feedbackflow/react-native
```
Now, update your `App.js/App.tsx` file to initialize Feedbackflow:
```javascript src/App.js theme={null}
// other imports
import Feedbackflow from "@feedbackflow/react-native";
const config = {
environmentId: "",
appUrl: "",
};
export default function App() {
return (
<>
{/* Your app content */}
);
}
```
## Required Customizations
| Name | Type | Description |
| -------------- | ------ | ---------------------------------------- |
| environment-id | string | Feedbackflow Environment ID. |
| app-url | string | URL of the hosted Feedbackflow instance. |
## Validate your setup
Once you’ve completed the steps above, validate your setup by checking the Setup Checklist in the Settings. The widget status indicator should change from this:
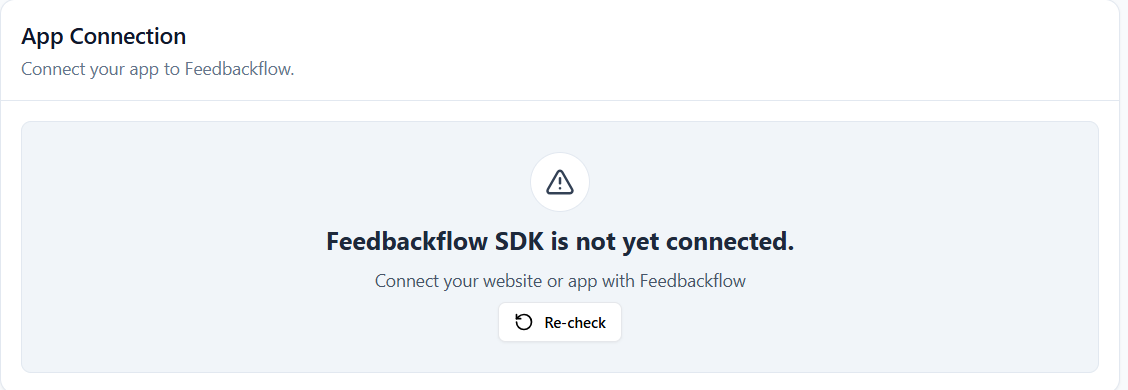 To this:
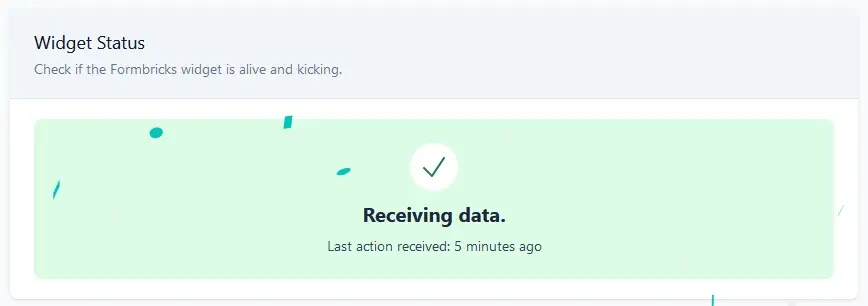
## Debugging Feedbackflow Integration
Enabling debug mode in your browser can help troubleshoot issues with Feedbackflow. Here’s how to activate it and what to look for in the logs.
### Activate Debug Mode
To enable debug mode, add `?feedbackflowDebug=true` to your app’s URL (e.g., [`https://example.com?feedbackflowDebug=true)`](https://example.com?feedbackflowDebug=true\)).
#### View Debug Logs
1. Open your browser’s developer tools:
* **Google Chrome/Edge**: Press `F12` or right-click and select "**Inspect" > "Console**".
* **Firefox**: Press `F12` or right-click and select "**Inspect Element" > "Console**".
* **Safari**: Press `Option + Command + C` to open developer tools and go to the "**Console**" tab.
#### Common Use Cases
Debug mode is helpful for:
* Verifying Feedbackflow initialization.
* Identifying issues with survey triggers.
* Troubleshooting unexpected behavior.
#### Debug Log Messages
Logs provide insights into:
* API calls and responses.
* Survey triggers and form interactions.
* Initialization errors.
```
```
To this:

## Debugging Feedbackflow Integration
Enabling debug mode in your browser can help troubleshoot issues with Feedbackflow. Here’s how to activate it and what to look for in the logs.
### Activate Debug Mode
To enable debug mode, add `?feedbackflowDebug=true` to your app’s URL (e.g., [`https://example.com?feedbackflowDebug=true)`](https://example.com?feedbackflowDebug=true\)).
#### View Debug Logs
1. Open your browser’s developer tools:
* **Google Chrome/Edge**: Press `F12` or right-click and select "**Inspect" > "Console**".
* **Firefox**: Press `F12` or right-click and select "**Inspect Element" > "Console**".
* **Safari**: Press `Option + Command + C` to open developer tools and go to the "**Console**" tab.
#### Common Use Cases
Debug mode is helpful for:
* Verifying Feedbackflow initialization.
* Identifying issues with survey triggers.
* Troubleshooting unexpected behavior.
#### Debug Log Messages
Logs provide insights into:
* API calls and responses.
* Survey triggers and form interactions.
* Initialization errors.
```
```